Friday, October 28, 2011

A color pencil portrait of JESSICA ALBA

Greetings again!

I have a little work here specially dedicated to my bro Ray, it was supposed to be finished by his birthday 2 months ago but then I'm late again... v___v .... sorry bro...

This is a color pencil piece. The last time I touched color pencils was 2 years ago. Lately, I was haunting my favorite stationery shop when I found this 60 color box. It was meant for children, I think, and cost $11. Brings me back to the memory of my childhood days, when my mom could only afford me a 12 piece box for school and I was always fascinated by my classmates' bigger boxes & variety of colors.

This set is not as good as the more professional types I can afford to use these days but I would like to see what I can really do with them. After all, this is the first time I ever own a 60 color set and it fulfilled my childhood dream in a way!

So here we go, beginning with:

A 3B pencil to sketch the outline and a kneadable eraser. I should be using a 2H for sketching when it comes to color pencil work but I don't like the hardness of the H pencils. I tend to press them harder and create some dents in the paper which would be devastating....


The smooth A3 size art cards. Why haven't I run out of them yet???


... and here's the star of the show, a 60 color pencil set. I always love the sight of multi colors... it makes me happy for no reason.


for some highlighting, I prepared a white Derwent watercolor pencil. It's soft and works like crayon... but I can only sharpen it with a knife and not my pencil sharpener.


Laying down the proportion with a rough sketch.


... getting there with the features...


... eyes & nose done...


... mouth, teeth & neck...


... skip to the big finish. The hair lines were very complicated and I had to check with a grid very carefully. It took me many hours to complete. Then I dabbed over the pencil lines with a kneadable eraser to lighten them so they would not smudge when the color is applied.


I started with a foundation of 'ivory'... It is pale yellowish.


... next, I work on the shading with 'pale orange'.


... slightly darker shading with 'light yellowish brown'.


... adding some bits of 'reddish brown'.


... defining the shading with 'brown'.


As I went on, I constantly came back to 'pale orange', coloring over the darker shadings and blending them more naturally.


... using the kneadable eraser to clean up some excess colors and create more highlights.


... working on the mouth and body after the face was basically done.


... darkening the shading further with 'vandyke brown', the darkest brown in the box.


... 'black' for the last. This is where the picture always come to life...


I colored the background with 'lavender' and 'violet'.


Working on the hair took many hours, applying:

1) cream yellow

2) light yellowish brown

3) reddish brown

4) brown

5) vandyke brown


All these would come to a rather light brown tone.


I like to save the 'black' for the last just to see the dramatic change it creates.


Finally, some bits of highlight with Derwent's 'chinese white'.

Like I mentioned before, I had to sharpen the tip with a knife instead of a pencil sharpener. I remember my mom sharpening my color pencils with a knife for me when I was a kid. She could do it so neatly and beautifully. I could never do that...
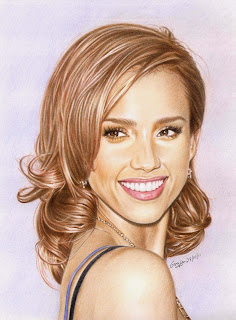


So here it is at last...

Sorry about the difference in tone between the photos and the final scan. I don't know how to manipulate photoshop over this matter because I'm a computer idiot...v___v

This one's for Ray, created with a certain childhood inspiration... n___n


This took me 36 hours and 15mins. I was working at snail's pace.

The colors had to be applied from the lightest tone to the darkest slowly and carefully because once a mistake is made with color pencils, it is very hard to remove or correct.

It was fun, though, even when I felt like I was going to die over it because it refused to finish...

Thanks for looking!

Friday, September 9, 2011

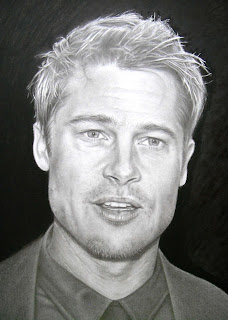
A Pencil Portrait of Brad Pitt

Hello again!

Yes I made it back once more... v___v

This time, I'm trying to learn how to work with 'circulism', which, according to what I read online, is a technique of drawing tiny circles for the shading and blending it with a tortillion also in a circular movement. This is supposed to create realistic skin texture as human skin is not perfect.

Well, I certainly hope I got it right. Here's the result, starting with:


My usual tools, pencils 3B to 8B, kneadable eraser & tortillion.


The A3 size smooth art card. I should start looking for Bristol board...


Tissues for blending photographic tone.


My new mechanical pencil (4B). The last one went home to its maker.


The Mono zero eraser. I cut the tip to make it even sharper.


A black marker just for the background only.


A Gelly roll pen for drawing some fine white hair.


So, here's the rough sketch to position the figure on paper.


Then drawing the position of the eyes...


Proportion of the features almost done.


Followed by the hair & neck proportion...


Basic shading with a 3B pencil over the face.


Blending the basic shading with a tissue to get a smooth tone.


Using the 3B and 4B pencils, I drew small circles as shading for the face. As the number of circles increased, the tone got darker. It is a very slow progress and took a long time to do.


Then I shaded over the tiny circles with a tortillion, moving also in circular movement. It created a sort of uneven tone in the shading.


Working very closely with tissue to ease the uneven shading a little so it would not end up looking lumpy...


Half the face done with the shading now...


Basic shading almost finished. Working on the stubbles...


Here:

1. Darkening the features with 4B and 6B pencils

2. bringing out some fine lines with a mechanical pencil loaded with 4B lead

3. drawing some fine white lines with the Mono zero eraser and

4. highlighting certain parts with a kneadable eraser shaped to a sharp tip.


Half the face darkened in shading...


Now the whole face is darkened in shading but this will not stand the test of black when it comes on later in the background.


Working on the hair now...


For the hair, fine lines can be drawn with the fine tip eraser and darker lines were done with mechanical pencil.


That's the hair for the time being...


Working on the shirt now. It's very dark in color and took a long time to build up to that tone.


To save some pencils I colored the background black with a big black marker first, then shade over the ink with a 8B pencil.


The parts closer to the figure were left white and to be filled in entirely with 8B pencil, carefully outlining the figure.


For some loose strands of fine white hair I used a Gelly roll pen to draw the lines, then shade over them carefully with tissues to make them look natural. When they got too dark, I worked over them with a fine tipped kneadable eraser to restore some highlight again.


Just as I expected, the figure looked like a washed out fading ghost from last century when it got surrounded by black. Is this the right method to do a portrait in black? ....??????


Busy last bits of touching up began... Adding more black (8B) to strengthen the shading and highlighting more parts with Gelly roll.


So here it is at last...

I can't remember the last time I was actually happy with my drawing, it must have been a good feeling... I don't seem to get that kind of feeling anymore...

I just want to do even better these days. Hope I find my way soon...


AND this one took me about 32 hours to finish, spread across 3 months!!!

I was out of focus as I was constantly tired. I'm tired of being tired... got to go do something about this...

Thanks for looking!